Note: We highly recommend using an inventory spreadsheet to import your items as we cannot capture important data such as cost, quantities, size, or vendor contact information through a menu. Click here to download a spreadsheet template.
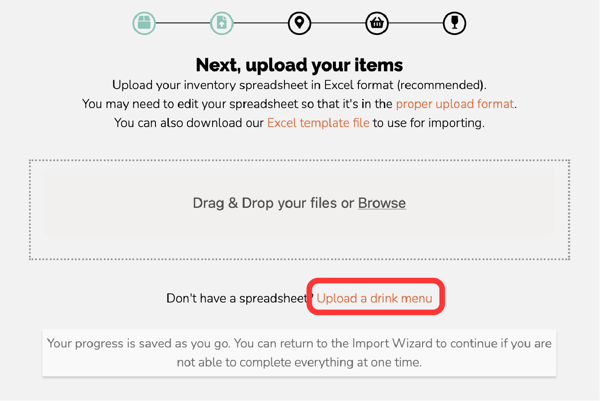
You can access the menu uploader on the second step of the Import Wizard.

Click on 'Upload a drink menu' under the main drag and drop box, and a window will appear. You can either upload a PDF file from your computer, or paste the PDF's URL or webpage URL into the text box. If you are entering a URL click Fetch to continue.
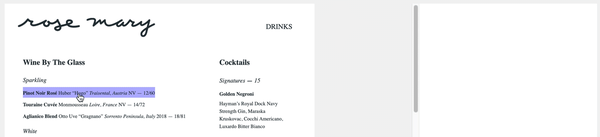
You will see a text-only version of your menu. On this page, click on the items you want to import into Backbar. Only select wine, beers, and spirits, and exclude any items like cocktails and recipes, food, and non-alcoholic products.
Grab items in bulk by first turning on Group Select, then clicking the first and last items in the group you want to import. Remove any unwanted items by either clicking on it again, or clicking the Trash icon next to its name on the right side.
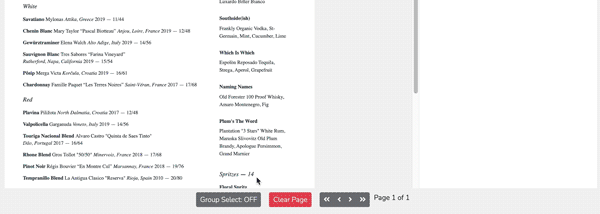
Continue to select items as necessary. Please note that after every group select you do the Group Select toggle will turn off and return to single item select.
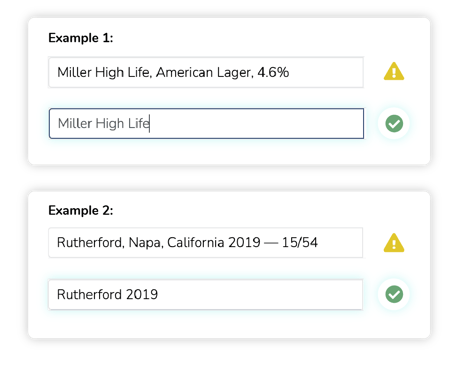
Edit item names as necessary on the right side. Each item should only include the product name - anything such as price, ABV, region, should be deleted. This will make it much easier when you have to match your products to the ones in our database.
The next step in the Import Wizard is to set up your vendors - if you've done so already, you can skip this step. To learn more about how to set up vendors and the whole Import Wizard in general, click here.
The next step is to map each of the wines, beers and spirits in your menu to the respective drink in the Backbar database. It is very important that you try to find a match for each item so you can easily filter your items, organize and drill-down into your reports (for example by drink types and styles). By finding a match, this will be automatic as Backbar knows the attributes of the products in our database.
The original name from your menu displays on the left side and next to that is the best guess for a match to the item from the Backbar database. If the item should not be imported (for example, if it is not a product), then click the Skip button. If the Backbar Name column shows a match to your item, click the Accept button. Otherwise if it is not a match or no suggestion is shown, click the Find Match button to find the match for your item.
The below image shows an example listing beers and the buttons we would click for each row:
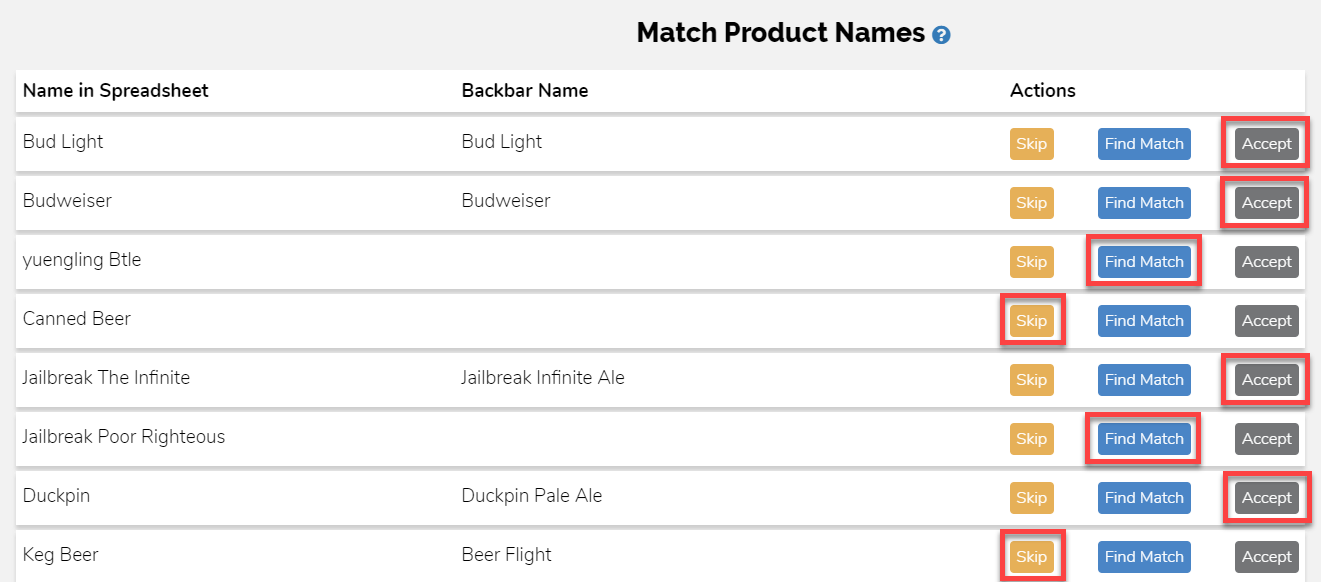
We are skipping the rows "Canned Beer" and "Keg Beer" because those aren't actually products. They were used as category names on the spreadsheet for organization. There are four products we can accept right away because the Backbar Name matches the product we intended.
There are two items in our spreadsheet however we need to click Find Match for. They both represent a different outcome so we'll walk through each of them. First, let's look at the item that in the spreadsheet is called yuengling Btle. Once we click Find Match we are shown a search box.

In this case it says that no results were found. The first thing to do is to try to change the search term to find the item. It is often best to just start deleting from the end of the search term, especially if it contains words or abbreviations that are not really part of the product name. In this case, we should delete off Btle in the search box. Our search will then look like this:
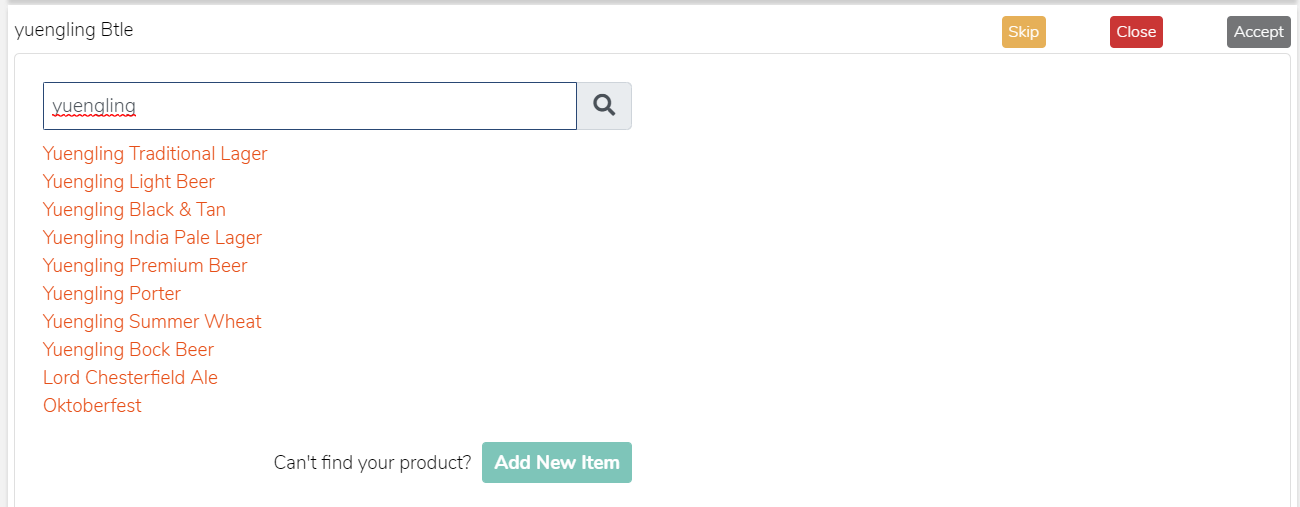
Now we have some valid matches. Click on the specific Yuengling beer that you have and it will then be accepted as a match.
Now let's look at the second item we need to find a match for called Jailbreak Poor Righteous. When we click Find Match again it will show no results. In this case, Poor Righteous is the name of the beer from Jailbreak Brewing Company. We can delete the name and just search for Jailbreak, but as the screenshot below shows we don't find a result for the beer we need.
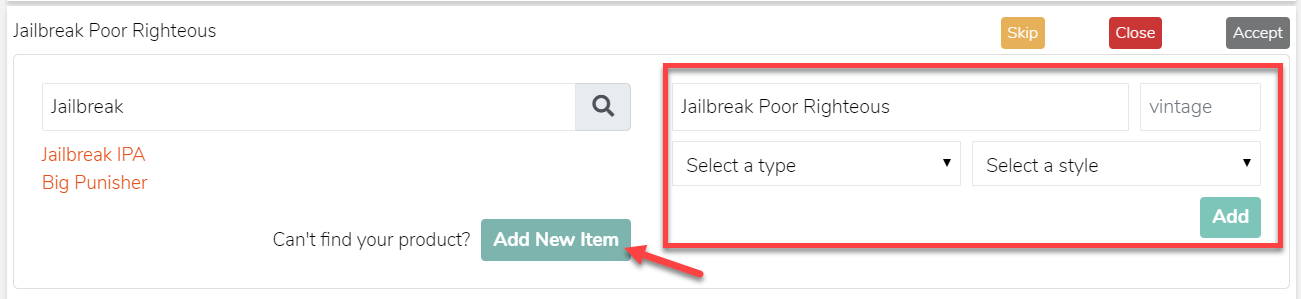
Since the beer is not already in the Backbar database, you need to add it manually by clicking on the Add New Item button. Four new fields will appear for you to put in the:
Be sure for the Name field, you enter in the full official name for the product, with no shorthand, so that our beverage team can locate the correct product.
When you add a new product that is not in our database, Backbar reviews the item and adds all the additional product information for it (such as the tasting notes, image, ABV, producer information, etc...). For that reason it is important that you give the full name of the product so that we know what it is to find the product information.
One you are done skipping items and accepting a match for each item, you can click the blue Finish button. All of your items will then be imported.
You don't need to complete the whole process in one sitting
If you have a very large menu, it can take a long time to find matches and add everything. Don't worry about having to complete everything in one session. Your matches are saved locally on your computer. So if you need to stop and come back to it later, your progress will be saved. You do not need to stay signed in or even leave the website open in your web browser. Next time you login and return to the Import Wizard, you will be right where you left off.
Skipped Items
If you accidentally skip an item, you can restore it back to find a match by click on the undo icon next to it in the skipped items list.
Some items may appear skipped automatically and without an undo icon. That means the item does not have valid data and cannot be imported.
When you click finish, any items that do not have an accepted match will be skipped automatically.
Navigation and Starting Over
If you made a mistake in mapping your fields or forgot to add a location in Backbar to match your spreadsheet, you can click the Previous button to go back and make changes.
If you have to change your menu after already accepting items, it is best to click the Start Over button. Note, this will erase any accepted items and skipped items you have made and start you from scratch.

