1. In the bottom navigation bar, tap Inventory (clipboard icon). Tap the Take inventory button.
2. Tap Start new session button on the next screen. If a session is in progress you may return to it by tapping Resume session. You can only have one open session at a time, in progress.
.jpg?width=200&height=428&name=startmobilesession(1).jpg)
3. Next, you'll see your inventory storage locations. If you haven't set up locations for your different storage and service areas, please do so before proceeding. To start counting, tap a location and begin entering quantities for each item.
Read: How to add inventory locations
.jpg?width=200&height=440&name=mobilelocaitonsscreen(2).jpg)
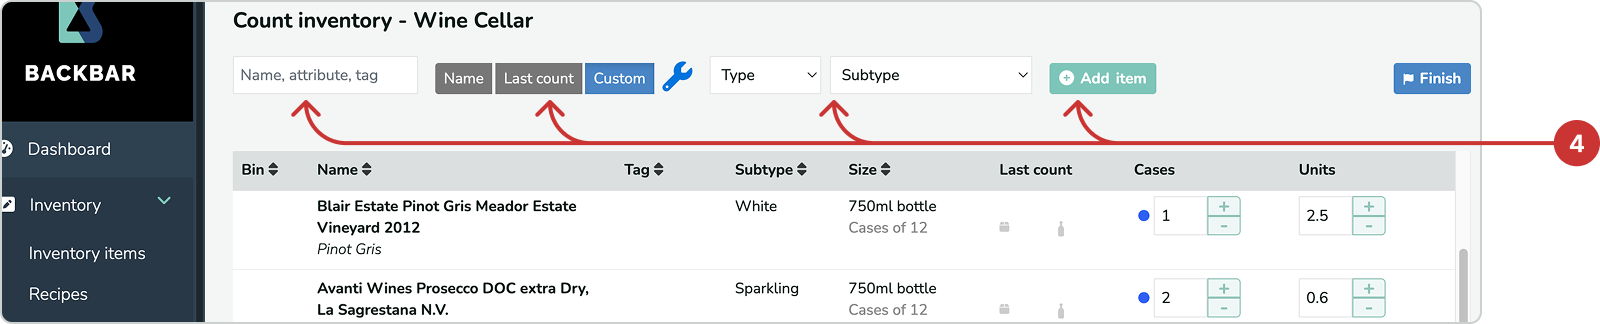
4. You will see a list of all your inventory items as shown below. There'll be a bottle slider to help estimate partial bottle volume to the nearest tenth of a unit, as well as entry fields for Case/Unit counts. You can change between Slider entry and Keypad entry from the buttons of the same name. Tap Next to move to the next item. Tap the Plus button to add a new item not currently in inventory.

Search Box: You can search here by name, but also by drink attributes! For example, if you are counting your whiskey shelf, type "whiskey" in the search box and you will see only a list of whiskies in the item list. To see the full item list again clear the search box.
Scanning: You may also tap on the small Bar Code icon on the right side of the Search Box and this will open the scanner linked to the camera on your mobile device. You can use this to quickly scan and jump to a linked item, or to add/link an inventory item to this Bar Code.
Sort Filters: will display above the item list and below the storage location name. You can access these sort filers by tapping the Filter Icon (funnel) to the right of the search bar. The default on new locaitons is a full alphabetical list (A-Z).
Last count: when selected the items will sort to last count on this location (items counted in sequence from your last session, with remaining items at the bottom of the last count sequence). You must complete a session before this is available on the subsequent session. Counting your items in the order they are laid out so that you can speed up the process by matching shelf-to-app layout.
Custom: when this sort method has been built for a location, "Custom" will default as the location sort (a user assigned list and sequence of items. Custom sorts are built within Manage Locations page on the web app).
You can also add filters for Type, Subtype, Style, and by Tags from the sort filters screen. Tap Reset on the top right to reset all filters to a full alphabetical view. Tap Apply filter when done.
.jpg?width=200&height=412&name=fitlerscreen(4).jpg)
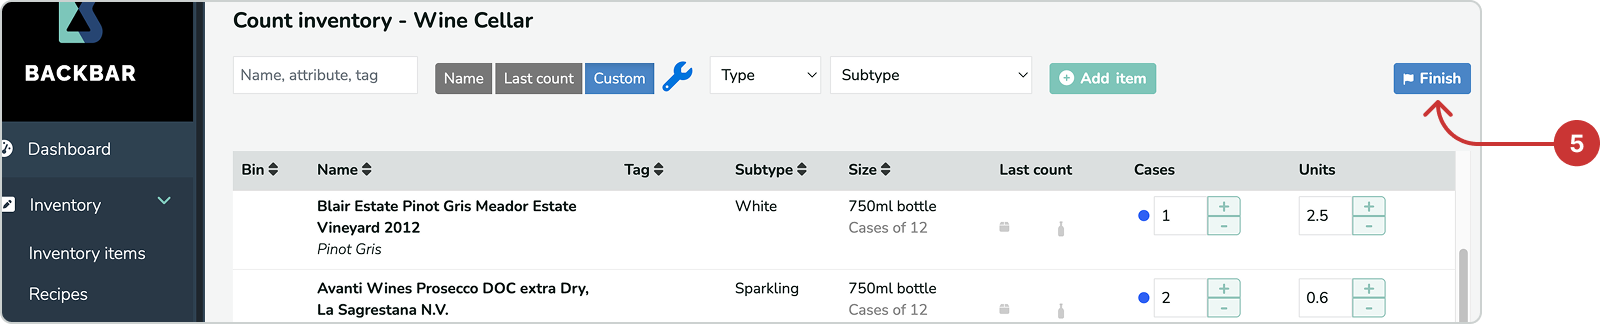
5. Once you have finished the count in a location tap the Finish location button and that location will conclude, and you will return to the list of inventory storage locations list. Completed locations will say "Completed" below after finishing. If you need to make an adjustment to a count in a completed location you can tap back into that location, make the change, and then tap Finish location again. Tap into the next storage location and begin to count again as outlined above. Repeat for all desired locaitons.
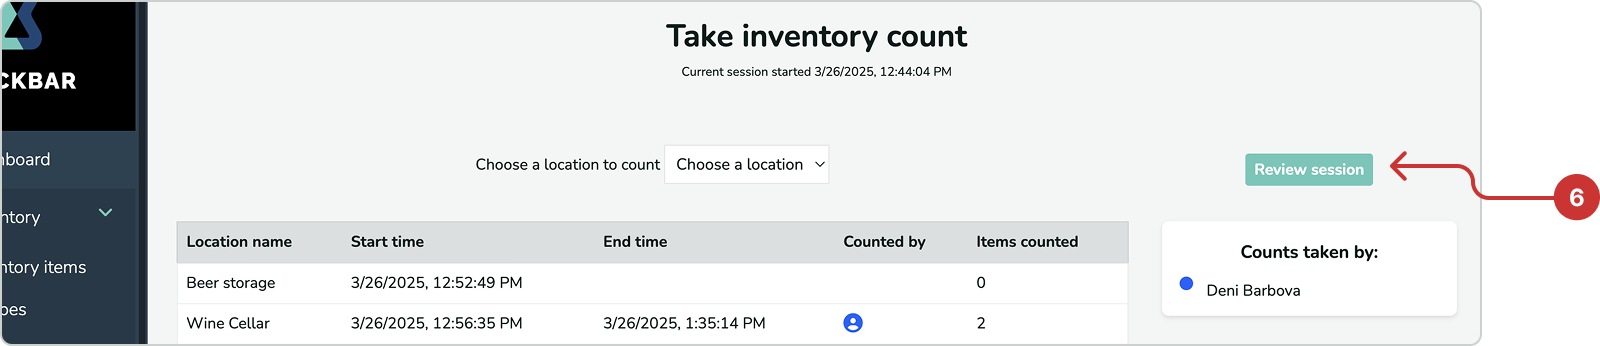
6. When finished with all location counts, tap Review on the locations list page to begin finalizing the Inventory session. You will receive a notification if any areas have been left as In Progress (started, but navigated away from the count screen prior to tapping Finish location).
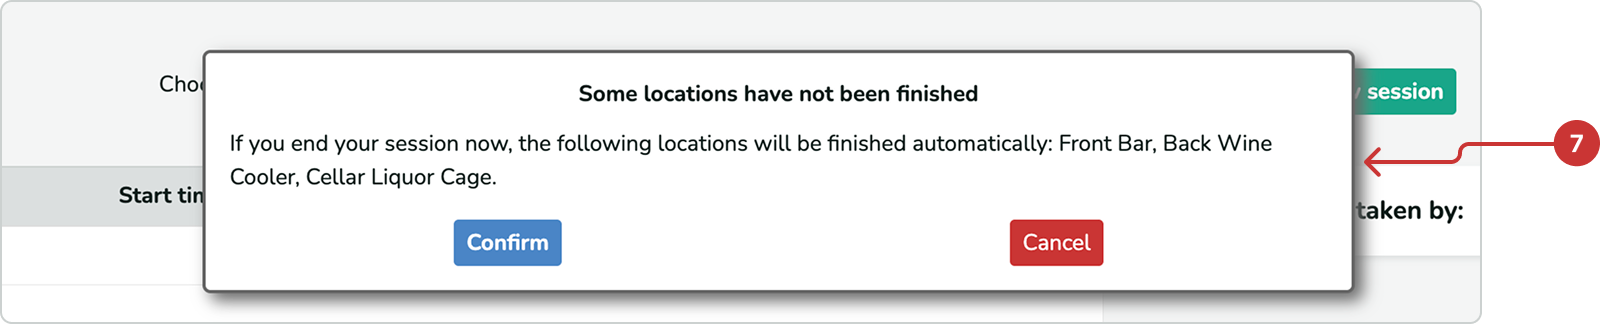
7. The last page before ending the session will show you how many items have not been counted (in red). Tap the back arrow and then resume to return to the locations screen and add any missing counts as necessary. If everything looks good tap End session.
.jpg?width=200&height=402&name=endsessionscreen(5).jpg)
8. End session pop-up screen will ask you to enter the date and time for the inventory session. By default this displays the current time and date, but this date is very important, as the closure time is the time when you are resetting the on-hand quantities on the account and assigning the reporting timestamps for many reports.
If it takes you a long time to complete inventory, and if the quantities of some items have changed due to sales or received orders, either backdate the session closure date/time to prior to those events, or return and recount items to include those changes.
You can also perform partial inventories with the How to Handle uncounted items selector. If you have counted a complete inventory and items that are uncounted are out of stock, select "Set quantity to 0". If you performed only selective item counts, select "Keep Quantity" and the current on-hand totals will remain on fully uncounted items.
Note if you count even 1 unit of an item in any location, you must count it in all locaitons. The uncounted items selector only handles items that have 0 as the count across all locations.
.jpg?width=200&height=407&name=endsessionmodal(6).jpg)
9. When everything has been assigned correctly, tap Finish to fully end the session. Congrats! You've finished taking inventory on the mobile app!